In this extensive article we will study the various kinds of crossovers and how to exploit, interpret and confirm them based on the interaction of indicators with the price and each other. We’ll describe them in various charts to make it easier for you as a reader to understand. The crossover strategy is popular and easy to use and identify, but it can also be troublesome because of its tendency to generate conflicting and false signals unless it is confirmed by other types of data.
Crossovers are thought to signal momentum change in the markets. When the main indicator crosses a predefined signal line, the trader will interpret this as a warning sign that something is changing with respect to either momentum of the price action, or its direction. But as we mentioned, crossovers are relatively common, and a strategy based on them alone is unlikely to work well in the absence of confirmation from other sources.
The signals generated by a crossover can be useful in a ranging or trending market, but in a trending market, a crossover is a less significant development than in a ranging market.
Let us examine the various basic crossover strategies.
Moving Average Crossovers
Moving average crossovers occur when a faster moving average rises above or falls below a slower one. For example, when a 13-day SMA (simple moving average) rises above a 100-day SMA, or when an 14-day EMA falls below a 50-day SMA, we will be studying a moving average crossover. In this type of crossover, the signal line is not static, and must be provided by the trader manually. This flexibility makes MA crossovers much more adaptable to changing market conditions, and in trending markets, MA’s can be greatly useful for our trading choices.
MA crossovers can be useful for both range trading, and trend following, but since moving averages generate smoother and more reliable signals in trending markets with relatively low volatility, the most successful use of the MA crossover is also in a trending market. Many traders choose to use a simple moving average for the slower MA, and an exponential moving average for the fast component. But this is not a necessity. Depending on the preference of the trader with regard to indicator sensitivity to price action, an EMA can be used or discarded altogether.
Learn more about simple moving average crossover strategy.
Learn more about exponential moving average crossover strategy.
In this section we will examine five different strategies based on MA crossovers.
Moving Average crossovers with a breakout scenario
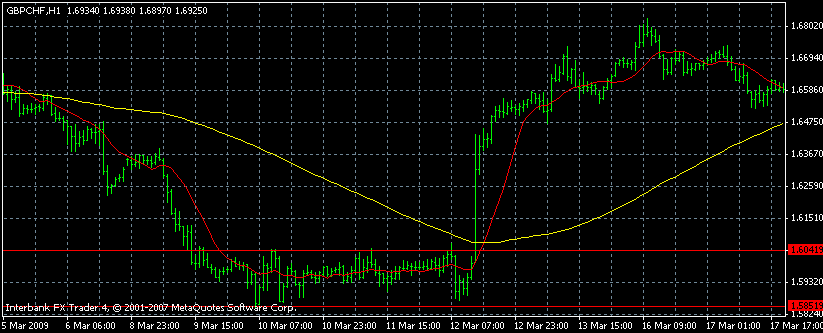
In this hourly chart of the GBP/CHF pair, we see an approximately three-day long range pattern developing between 1.5851 and 1.6041 price levels, with the 13 hour MA depicted in red remaining consistently below the yellow 100-hour MA for the entire duration of this period. The price fluctuates between the temporary support and resistance lines (shown as red lines on the graph), and the faster 13-hour moving average settles to a very quiet consolidating pattern in the same period. Neither the MA not the price action gives any meaningful signal with respect to the future, until the eventual breakout occurs.
At around 5 am on the 12th March, we see a sudden spike in the price action, which quickly causes the more sensitive 13-hour simple moving average to spike up also and eventually to rise above the yellow 100-hour simple moving average, and a crossover occurs, and after the price keeps rallying powerfully, reaching riught up to 1.68 eventually. In this scenario, the significance of the crossover is amplified by the long duration of the preceding consolidation pattern, and the quiet and subdued price action. Since markets rarely remain so quiet for a protracted period of time, the eventual crossover creates a very reliable signal for the violent upswing of the price.
Moving Average Crossovers with RSI
Before examining this chart, let us first note that the moving average crossover, and the RSI are both lagging indicators. While using them together on a trend pattern to identify peak values, while filtering the false signals by usage of the crossover is surely possible, the trader must be judicious in selecting the more reliable scenarios by concentrating on the most extreme indicator values. Learn more about the RSI indicator here.
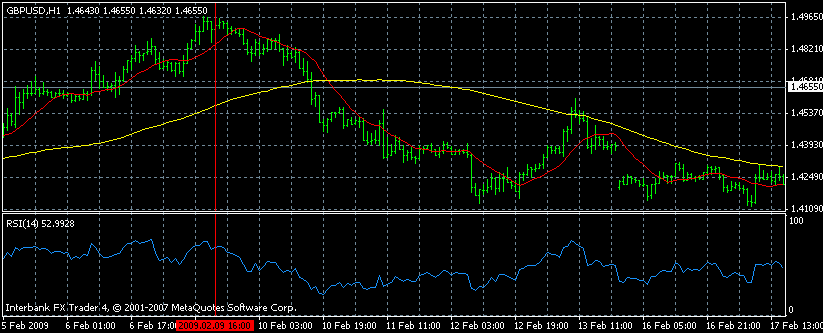
Here, as in the previous example, the yellow line is the 100-hour SMA, and the red line is the 13-day SMA In this hourly chart of the GBP/USD pair we note that the RSI remained above 50, closing to and exceeding the 70 level for a number of times in the period leading to the MA crossover. A short while after 9th February around 4 pm, when the price itself peaked, the RSI entered two day long downward move which kept it under 50 for that period. Similarly, around midday on 10th February, an MA crossover occurred, with red 13-hour SMA moving below the yellow 100-hour SMA. Confirmed by both the bearish MA crossover, and the RSI value under 50, the price made a 500 point move which could be exploited in its entirety if the trader had opened a position as soon as the MA crossover occurred.
MA Crossovers with the Parabolic SAR
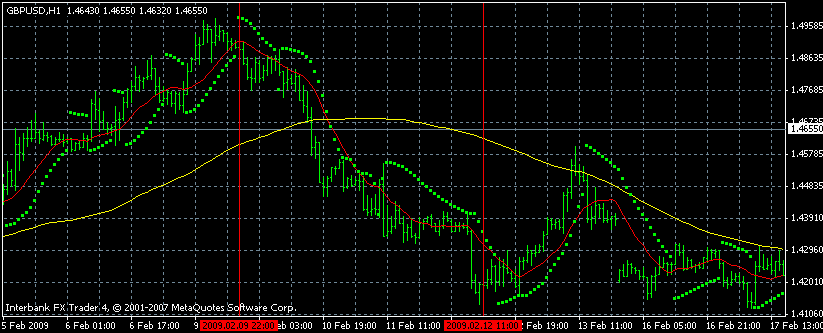
We will keep discussing the possible technical strategies that can be implemented by MA crossover on the same hourly chart of the GBP/USD pair. As before, the red line is the 13-hour SMA, the yellow line is the 100-hour SMA, while the dotted green lie is the parabolic SAR. In order to make it more convenient for the reader, we have delimited the period we will study with the two red vertical parallel lines on the chart. Learn more about the Parabolic SAR indicator here.
This time, the change in the direction of the price action is indicated by the parabolic SAR first, as it rises above the price, and signals a period of downward movement at around 10 pm on February 9th. As expected, the price enters the hourly downtrend, and keeps moving in that direction, and a short while later we receive the final confirmation of the hourly downtrend as an MA crossover occurs, with the 13-hour SMA moving below the 100-hour SMA, constituting an sell signal for the trader.
Finally, the price collapses, and remains below the parabolic SAR to around 11 am, February 12th, when our signals are negated with the parabolic SAR rising above the price action. Similar to the above, if the trader had held his position from the time of the crossover until the negation of the parabolic SAR signal, a 500 point profit would be easily achievable. Even after the downtrend dissipates, however, the 13-hour SMA remains below the 100-hour SMA, demonstrating the unreliability of crossovers when used alone.
MA crossovers with Heiken Ashi
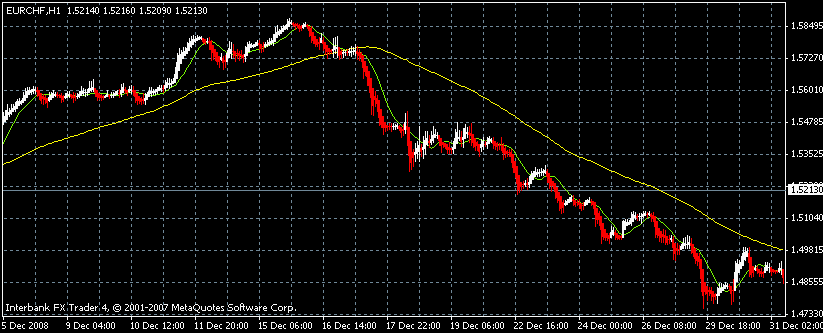
Using MA crossovers with the Heiken Ashi is both easy and simple. In this hourly chart of the EUR/CHF pair, we denoted the 13-hour SMA with light green, while the yellow line depicts the 100-hour SMA, as in the previous examples. The Heiken Ashi allows us to better evaluate the strength and direction of the price action, and its coloring is more solid than that of the candlestick chart. Learn more about the Heiken Ashi indicator here.
On 16th December 2008, the price falls below both the 13-hour, and 100-hour simple moving averages, while at the same time moving average crossover occurs, as the 13-hour SMA itself moves below the 100-hour SMA. Apart from the moving averages, the Heiken Ashi also turns red, and confirms that a period of downward price action is to be anticipated. All these expectations are realized as the Heiken Ashi remains overwhelmingly red for about 13 days, and the price itself rarely manages to rise above the 13-day MA. By using this strategy, the trader could have realized a 1000 –pip profit in just 13 days, while placing his stop-loss, or take profit order on the 100-day SMA.
MACD Crossovers
The MACD uses a 9-period exponential moving average for its signal line, and the indicator itself is the difference between the 26 and 12-period exponential moving averages. Since the indicator is a number of moving averages combined in various ways to generate signals, the various methods which were discussed in the previous section on moving average crossovers can also be used with the MACD. The important point to remember is that the MACD is almost useless in a ranging market. The exponential moving averages are prone to generating many false signals in a ranging environment.
Divergence/Convergence is probably the most useful method for deriving signals form the behavior of the MACD. Still, the crossover of the signal line can also be useful if it is used judiciously, and combined with different kinds of signals from other types of indicators its tendency to give false signals can be eliminated to some degree.
In this section we will examine four different technical strategies which use the MACD as a basis.
MACD Crossover with Divergence/Convergence
The most basic strategy utilizing the MACD crossover is the one which confirms the signal with a divergence or convergence between the price and the indicator. This scenario is thought to be one of the rarer by technical analysts, and is consequently regarded as a great opportunity when it is identified.
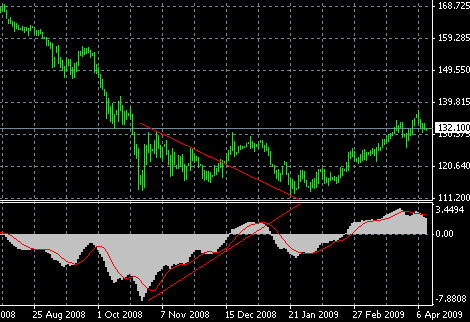
In this daily chart of the EUR/JPY pair, the MACD reaches an extremely low level toward the end of October, and rapidly begins an uptrend which culminates around the middle of December. The price on the other hand, keep falling lower and lower even as the MACD rallies, and consolidates into a triangle pattern the upper side of which creates a convergence pattern with the MACD. At the same time, The MACD’s rally takes it right up to the crossover line on 15th December 2008, where the price finally breaks the downtrend, and confirms the movement of the MACD with an upward breakout for an eventual profit of 600-800 pips if the trader made his entry close to the occurrence of the crossover. Indeed, the convergence between the price and the indicator signal a longer term change, as seen by the subsequent price action. A take profit order could have been realized when the MACD leveled out and stopped rising close to end of December. The chart stop for this strategy could be either at the crossover line of the MACD, or on the upper side of the triangle for by the price action between mid-October, and 15th January.
Divergence/convergence patterns are regarded as the most reliable signals generated by the MACD, but we’ll examine them in greater detail later.
MACD Crossover with Heiken Aishi
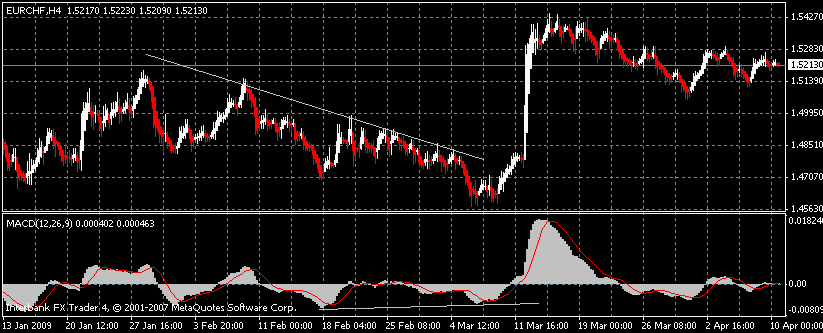
The chart shows the four-hourly price action of the EUR/CHF pair between 13th January and 10th April 2009. Here we will use the Heiken Aishi to confirm the MACD crossover. Right up to around 11th March, the price moves in a volatile downtrend which forms a descending triangle between 27th January and 8th March. An interesting feature of the above graph is the existence of a slight but discernible convergence between the price action and the indicator, as denoted by the white lines. Until March 11th, the crossovers on the MACD did not match a correspondent string of solid coloring on the Heiken Aishi, and as a result. there was no reliable pattern to trade.
On March 11th, however, not only does the MACD cross over the signal line, but also the Heiken Aishi begins to register a solid string of white bars which signal that the nature of the price action, and the attitude of market participants is in danger of reversing. And indeed, soon after the breakout of from the downtrend line stretching back to 27th January occurs, the price rallies with great speed, creating a long and solid white pattern on the Heiken Aishi, as the MACD keeps rallying strongly.
The entry point for this strategy, is the MACD crossover point over the signal line. The take profit order is executed when the MACD histogram (the cluster of white bars on the lower chart) begins to slope downward.
MACD Crossover with Parabolic SAR
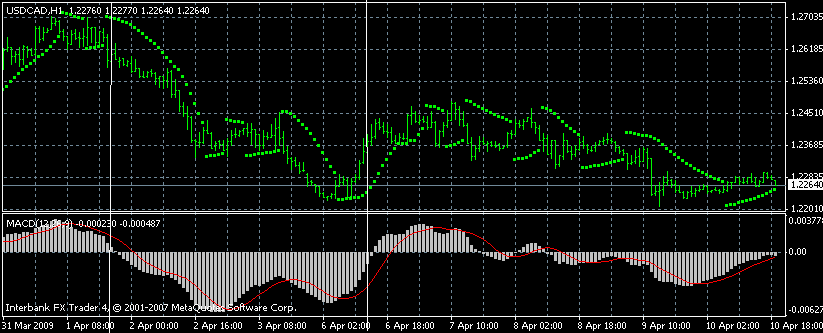
We will examine the MACD Crossover/Parabolic SAR strategy on the hourly chart of the USD/CAD pair. The lower chart depicts the MACD, while the green dotted line on the upper draws the Parabolic SAR.
On this chart there are a number of actionable scenarios based on this strategy. Beginning from the left side, and around 7 pm 1st April 2009, we notice the MACD crossing under the signal line, and a short while after that Parabolic SAR also moves above the price, signaling an hourly downtrend. As anticipated, the price keeps moving down until around midday on the 2nd April, when the parabolic SAR breaks its string of values above the price, and starts emitting confusing signals. For this trade, the time when the crossover is confirmed by the Parabolic SAR would constitute our entry point, and we would take our profit when the price moved backed above the Parabolic SAR.
Sometime later, around midday on 6th April 2009, the Parabolic SAR moves under the price, and the MACD soon follows and confirms it by rising above the signal line. Once again the price acts in line with our expectations, and keeps rising until the P. SAR moves below the price. The result is a profit of around 100 pips, provided that the crossover is the entry point, and profit is taken when the price moves back under the P. SAR.
In order to successfully use this strategy, the trader can use the Heiken Aishi bars instead of the ordinary bar charts and candlesticks. It is also possible to avoid false signals by considering only the crossovers the slope of which is greater than, or equal to 45 degrees.
MACD Crossover with Fibonacci Time Series
Using the Fibonacci series with trend indicators such as the MACD can be a bit complicated at time. Because trends favor violent movements, the Fibonacci support, resistance, extension levels may not be very useful for providing guidance on profitable entry or exit points. The Fibonacci series is very flexible and useful however, and if we cannot use it to evaluate the value of the price action, it is still possible to use it for measuring the length of the trend’s various phases. Learn more about the Fibonacci ratios here.
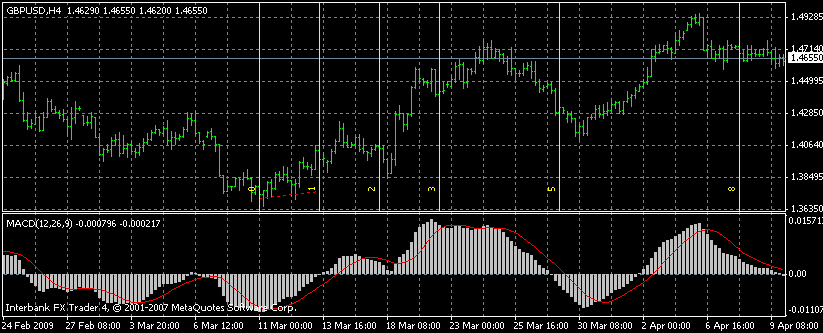
The chart above depicts the four-hourly price action on the GBP/USD pair. The yellow vertical lines show the fibonacci time series, and the lower chart pairs the price action to the MACD. All we need to do in order to draw the Fibonacci time series is to identify the extremes and crossover on the MACD, and to draw the first two yellow lines over them.
As we can see clearly, the Fibonacci time series is very capable of predicting extreme on the MACD once it is drawn. The periods 1,2, 5 correspond to crossovers on the MACD, while 0 and 3 are extreme values. This strategy can be used in combination with one of the above, or can be used alone in order to decide on how long the trade must be open. For instance, the crossover at 2 would not be indicate a buy order if it had not coincided with another period on the Fibonacci time series. But as it does, a buy order could be opened, and held until the 3-period of the series was reached, when profit would be taken.
Stochastics Crossovers
The stochastics indicator is best used in a ranging environment; as a result the best results are gained by employing the crossover strategy in the presence of clear support or resistance lines, breakout patterns. On the other hand, the stochastics indicator is very prone to generating many useless crossovers when the price is consolidating, and it must be confirmed by other kinds of preferably non-oscillating indicators or patterns before reliable signals are generated. To remind the reader, when the blue line (slower component of the stochastics indicator), crosses over the red line (the faster component) the crossover is bullish, and it is bearish in the opposite situation.
Here we’ll examine four different strategies that can be used with a stochastics crossover.
Stochastics Crossover with Support and Resistance Lines
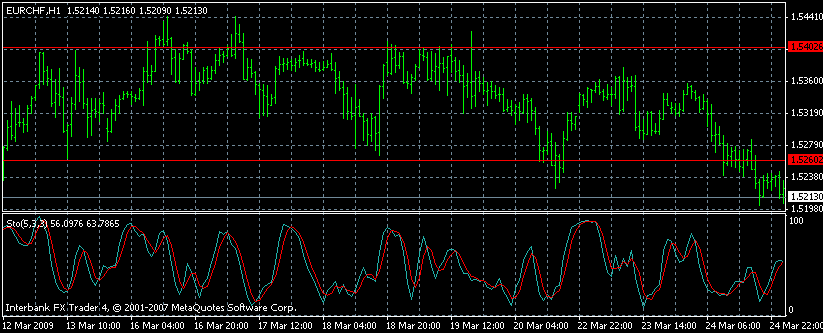
This is an hourly chart of the EUR/CHF pair, and the support and resistance lines are at 1.526, and 1.54. Between 12th March and 24th March, the price moves back and forth in the range established, and as a range pattern analysis tool, the stochastics indicator provided many actionable signals during this period.
Our trading strategy involves taking advantage of crossovers that occur close to the support or resistance lines which denote the limits of the price action. Since we are confident that a reversal close to the support/resistance lines will signal that the price action will continue in the established direction, we have a good risk/reward scenario for exploiting the crossovers. For example, on 8 pm, 16th March, we will short the EUR/CHF pair, even before the price moves back under the resistance line once the failure of the breakout is established on the stochastics indicator as the blue line(slower component) crosses under the red(faster component) line.. Around 4 am, on March 20th, we will buy the EUR/CHF pair, and hold it as the blue line crossover over the faster red line.
In using this strategy, we must require two different confirmations before we will open a position. The price action close to the support or resistance lines must be vigorous, the stochastics crossover must not be reversed. In other words, we do not want the price action to be confusing, and directionless close to the support or resistance lines, so that we will not be whipsawed by a false breakout. Our stop-loss orders will be 30-40 pips beyond the support/resistance lines, while the take profit order will be at the other side of the channel delimited by them.
Stochastics Crossover with Breakout
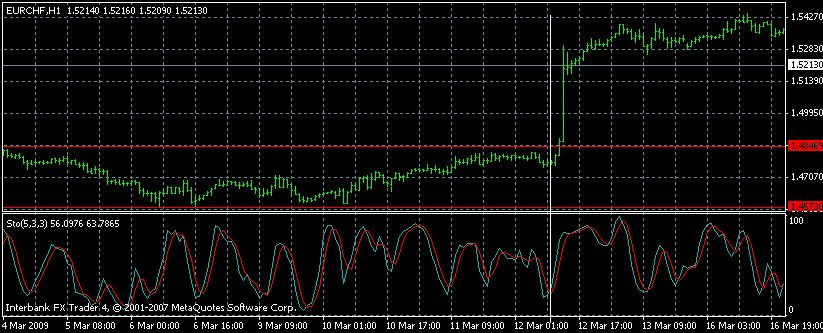
The stochastics crossover breakout strategy is the opposite of the stochastics crossover with support/resistance lines strategy. In the latter, we had attempted to benefit from the oscillations of the price between the edges of the range; in this strategy, we’ll attempt to identify and exploit a range breakout using a stochastics crossover.
The above graphic shows the hourly graph of the EUR/CHF pair, with a range defined between the resistance line at 1.4846, and the support line at 1.457. The range holds for about 8 days between March 4th, and March 12th, until on the same date a violent breakout leads to an immediate 350-400 point move to the upside. The breakout was signaled by a number of phenomena. First, 11th March was a whole day of consolidation, as seen on the graph, with the price confined into a very tight range. Second, the price consolidation occurred very close to the main resistance line. Third, in order to prepare the breakout, the stochastics indicator moved lower and lower, and stayed there until the breakout occurred.
The breakout was signaled by a crossover as the price moved beyond the range, and the price action quickly confirmed the convincing nature of the crossover, in a period of four hours completing a breakout close to 400 points. The trade would be entered at the time of the crossover, both the stop-loss, and the take profit order would be defined by the chart, and be signaled by a bearish crossover of the stochastics indicator. If the crossover occurred after a breakout, the take-profit order would be executed. If the crossover occurred before the breakout, the stochastics indicator would cause a stop-loss order to be executed.
Stochastics Crossover with Parabolic SAR
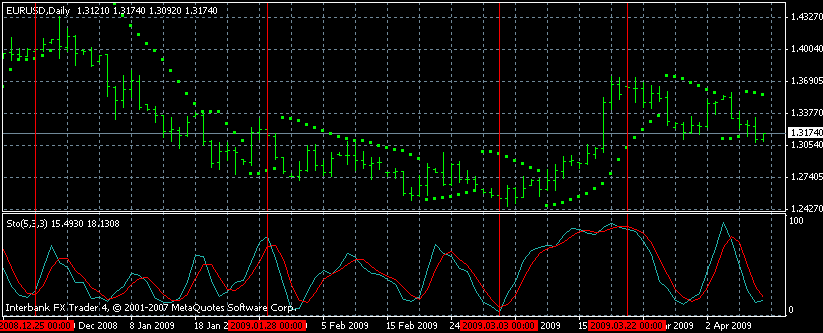
In this daily price chart of EUR/USD pair, we find four different signals generated by the confirmation of a stochastics crossover by the Parabolic SAR. The lower chart shows the stochastics indicator, while the dotted line on the upper depicts the Parabolic SAR. We will examine the three more reliable ones occurring around December 25th 2008, January 28th, 2009, and March 3rd. The last one on March 22nd is quickly contradicted by the confusing signs of the Parabolic SAR, as it moves up and below the price without generating any meaningful signal.
A short while after the early hours of December 25th, as indicated by the large vertical line at the left side of the chart, the blue line of the Stochastics indicator moves below the red line, signaling that the upward movement of the price is losing its momentum. Soon after that, the Parabolic SAR also moves above the price action on the upper chart, and confirms the momentum change signaled by stochastics. After that, the stochastics indicator remains below the 50 level, and the price moves in a gently sloping downward trend from 1.40 down to 1.27. The sell order would be initiated when the crossover occurred, at around 1.4, and the take profit point would be at about 1.3-1.31, as indicated by the rise of the stochastics indicator above 50, or by the Parabolic SAR moving below the price action. The stop-order would be a chart stop, realized when the Parabolic SAR indicated an imminent upward movement by moving below the price.
In the second case, on January 28th, midnight, another crossover occurs on the stochastics indicator, with the blue line once again crossing below the red, as the Parabolic SAR rises above the price, both indicating an imminent downward movement. We use the same entry/exit rules as in the previous paragraph, and depending on the timing, a profit of around 100 point is the result.
In the last scenario, where we use the same rules to open or close the trade, we initiate the trade when the bullish stochastics crossover is confirmed by the Parabolic SAR moving below the price. In this case the position is opened at 1.25, and closed at 1.31, with a profit of around 600-pips.
The general rule is initiating these trades only when the price, and both indicators confirm the scenario which we have devised.
Stochastics Crossover with Heiken Aishi
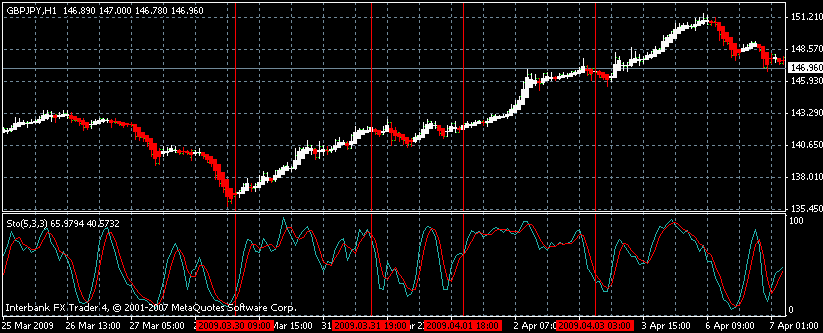
The chart is an hourly chart of the GBP/JPY pair; the lower section shows the stochastics indicator, while the price action is depicted using the Heiken Aishi tool. The vertical lines indicate crossovers where the value of the stochastics indicators was changing rapidly. At such occasions, we try to capture trend changes.
In using the Heiken Aishi chart with the stochastics indicator there will be two rules for determining entry or exit points: We will open a a position when a crossover occurs, and the color of the Heiken Aishi changes, will maintain it until the value of the stochastics indicator falls below 50. After we initiate the trade, we’ll close the position when the Heiken Aishi bars change their colors, or the stochastics indicator makes a crossover to contradict our trade. For example, if we bought the currency pair on a string of white Heiken Aishi, we’ll close it when there are more than four consecutive bars in the red. Let’s see this with an example.
On March 30th 2009, around 9 am, a bullish stochastics crossover occurred, as indicated by the rise of the blue line over the red. Similarly, the Heiken Aishi chart changed its colors to white, after a long string of red before the crossover. We open a position at around 1.37, a little while after the crossover and color change occur.
After that, the number consecutive red bars on the Heiken Aishi never exceeded four, and the stochastics indicator’s value remained above 50, until around midday April 1st. We close our position once the stochastics indicator moves below 50, when the price is around 1.31, and our account registers a 400 point profit.
Commodity Channel Index with Fibonacci Time Series
In this part we will not examine a crossover, but will study another example on using the Fibonacci time series for confirming the action on an indicator.
As we know, the commodity channel index was devised for commodity trading at first, due to its perceived utility in indicating cyclical changes of the price. The problem with this indicator arises out of the fact that the extremes registered on the price chart are extremes only on a relative level. There’s no method for determining if an extreme value on the indicator will be invalidated by another, yet more extreme value as time passes.
In order to overcome this problem with the CCI we’re going to examine a strategy which attempts to confirm price extremes by the periods indicated by the Fibonacci Time series. In short, we will attempt to match price extremes with the periods of the Fibonacci series.
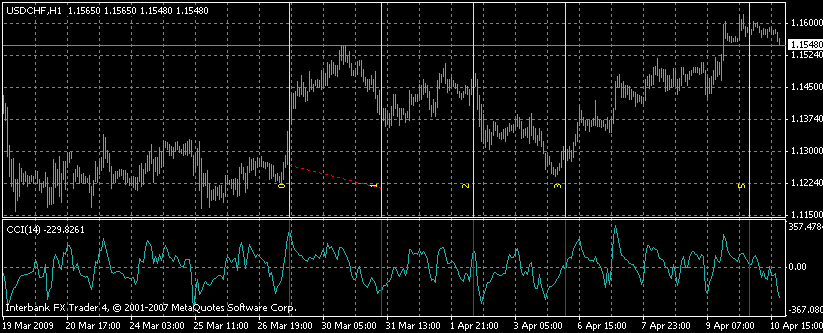
On the above hourly chart of the USD/CHF pair, the yellow vertical lines show the fibonacci time series, while the lower section depicts the CCI oscillator. We decided to regard the large breakout on 26th March 7 pm as the beginning of a new period following the consolidation and range pattern prior to it. Thus, we begin the Fibonacci time series at the CCI extreme matching the upswing. In order to define the closing point of the first period of the Fibonacci series, we seek the lowest value of the CCI indicator following the extreme at 7 pm, and find it on 31st March, where we close the first period of the Fibonacci series.
As it is clearly seen, the following progression of the Fibonacci Time Series matches extreme values remarkably well during the ten days after the first period of the series. The 2-period, 3-period, and 5-period all match price extremes on the chart with great accuracy.
We will use such combinations of the oscillators with the Fibonacci Time series in order to divide the price action into eras which can be used to profit.
Conclusion
As we have noted before, crossovers rarely generate reliable signals when used alone. Their reliability is even less with oscillators that fluctuate with greater frequency. By matching the crossovers on the indicators with signals generated from the price action, the trader can confirm the potential scenarios of his analysis with data from different sources, increasing reliability. It is also possible to compound these signals with even more complex strategies, but we will discuss the details of this subject in another article.
Further reading about forex indicators.
The simple moving average indicator explained with strategy and metatrader settings.
The exponential moving average indicator explained with strategy and metatrader settings.
The Heiken Ashi indicator explained with strategy and metatrader settings.

Forextraders' Broker of the Month
BlackBull Markets is a reliable and well-respected trading platform that provides its customers with high-quality access to a wide range of asset groups. The broker is headquartered in New Zealand which explains why it has flown under the radar for a few years but it is a great broker that is now building a global following. The BlackBull Markets site is intuitive and easy to use, making it an ideal choice for beginners.